R.drawable.ic_launcher 문제를 해결하려면 drawables를 사용하는 대신에 mipmaps를 사용한다.
public class MainActivity extends AppCompatActivity {
@Override
protected void onCreate(Bundle savedInstanceState) {
super.onCreate(savedInstanceState);
TextView MyText = new TextView(this);
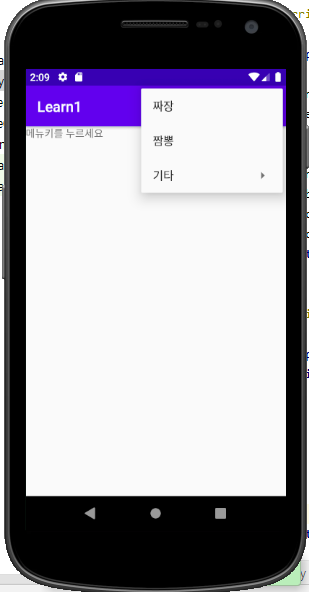
MyText.setText("메뉴키를 누르세요");
setContentView(MyText);
}
@Override
public boolean onCreateOptionsMenu(Menu menu) {
super.onCreateOptionsMenu(menu);
MenuItem item = menu.add(0,1,0,"짜장");
item.setIcon(R.mipmap.ic_launcher);
item.setAlphabeticShortcut('a');
menu.add(0,2,0,"짬뽕").setIcon(R.mipmap.ic_launcher);
SubMenu etc = menu.addSubMenu("기타");
etc.add(0,3,0,"우동");
etc.add(0,4,0,"만두");
return true;
}
@Override
public boolean onOptionsItemSelected(MenuItem item) {
super.onOptionsItemSelected(item);
switch(item.getItemId()){
case 1 :
case 2 :
case 3 :
case 4 :
Toast.makeText(this,"메뉴선택",Toast.LENGTH_SHORT).show();
return false;
}
return false;
}
}
=======================================================================
xml 메뉴파일을 이용한 메뉴구현..
안드로이드 스트디오 1.1 이후로는 메뉴에서 drawable을 사용하지않고 mipmaps폴더의 lanuncher를 사용합니다.
핸드폰의 해상도별로 아이콘을 다르게 서비스해줄 수있기 때문에 mipmaps를 사용한다고 합니다.
<menu xmlns:android="http://schemas.android.com/apk/res/android">
<item android:id="@+id/jjajang"
android:title="짜장"
android:icon="@mipmap/ic_launcher"
/>
<item android:id="@+id/jjambbong"
android:title="짬뽕"
android:icon="@mipmap/ic_launcher"
/>
<item android:id="@+id/submenu"
android:title="기타">
<menu>
<item android:id="@+id/udong"
android:title="우동"
/>
<item android:id="@+id/mando"
android:title="만두"
/>
</menu>
</item>
</menu>
===================================
public class MainActivity extends AppCompatActivity {
@Override
protected void onCreate(Bundle savedInstanceState) {
super.onCreate(savedInstanceState);
TextView MyText = new TextView(this);
MyText.setText("메뉴키를 누르세요");
setContentView(MyText);
}
@Override
public boolean onCreateOptionsMenu(Menu menu) {
super.onCreateOptionsMenu(menu);
MenuInflater inflater = getMenuInflater();
inflater.inflate(R.menu.optionmenu, menu);
return true;
}
@Override
public boolean onOptionsItemSelected(MenuItem item) {
super.onOptionsItemSelected(item);
switch(item.getItemId()){
case R.id.jjajang :
case R.id.jjambbong :
case R.id.udong :
case R.id.mando :
Toast.makeText(this,"메뉴선택",Toast.LENGTH_SHORT).show();
return false;
}
return false;
}
}
========================================
menu xml에서 onclick 속성을 사용하는 방법,
-----------------------------------------------------
---- onclickmenu.xml -----
<menu xmlns:android="http://schemas.android.com/apk/res/android">
<item android:id="@+id/about"
android:title="프로그램 소개"
android:onClick="mOnClick"
/>
<item android:id="@+id/help"
android:title="도움말"
android:onClick="mOnClick"
/>
</menu>
------------------------------------------------------------------
public class MainActivity extends AppCompatActivity {
@Override
protected void onCreate(Bundle savedInstanceState) {
super.onCreate(savedInstanceState);
TextView MyText = new TextView(this);
MyText.setText("메뉴키를 누르세요");
setContentView(MyText);
}
@Override
public boolean onCreateOptionsMenu(Menu menu) {
super.onCreateOptionsMenu(menu);
MenuInflater inflater = getMenuInflater();
inflater.inflate(R.menu.onclickmenu, menu);
return true;
}
public void mOnClick(MenuItem item){
switch (item.getItemId()){
case R.id.about:
case R.id.help:
Toast.makeText(this,"onClick",Toast.LENGTH_SHORT).show();
break;
}
}
}
==========================================================================Goodbye launcher drawables, hello mipmaps!
(UPDATE 18th FEB: Android Studio 1.1 has been released!)
The upcoming release of Android Studio 1.1 will largely be a bug fixing release. There is one change however that might catch your eye when creating a new project. Projects now create launcher icons in the mipmap resource folders instead of the drawable folders. I am sure we will hear a lot more about this with release of Android Studio 1.1 coming very soon.
Why use mipmaps for your launcher icons?
Using mipmaps for your launcher icon is described as best practice by the Android team. The advantage you get is that you can keep resources in the mipmap folders for all device densities and then strip out other resources from the drawable folders that are not relevant to the specific users device density.
Here is an example, say a user has a device that is classified as xxhdpi. The drawable resources in your apk for all other densities, such as xxxhdpi, are not required and can be stripped out. The launcher icon is different to other resources as it is possible that a higher resolution icon is displayed in the users launcher. If that higher resolution image has been stripped from your drawables folder, then a lower density icon will programmatically be up-scaled. This may cause an unattractive blurry icon.
You may not be producing multiple apk files with stripped out resources to minimize apk size yet. Therefore making the change to mipmaps for your launcher icon will currently not make any difference. That does not mean you should not do it. The best reason for using mipmaps folder is that the Android team want you to and describe it as best practice. They know what new features are in the pipeline for Android and who knows, but maybe they are planning to introduce a new feature where unused resources are automatically stripped for the user when they download apps.
History of launcher mipmaps in Android
The mipmaps resource folders in Android started appearing long before they were introduced to the wider Android development community to use, which started in Android Jelly Bean 4.3. Very little official information came from the Android team about why to use them. Around the time of the release of 4.3, Android framework developer @hackbod announced:
…if you are building different versions of your app for different densities, you should know about the “mipmap” resource directory. This is exactly like “drawable” resources, except it does not participate in density stripping when creating the different apk targets.
REPORT THIS AD
Since that time if you have taken a close look at the apps produced out of Google you will notice that some apps were doing exactly that. Shipping only the required density but including all densities in the mipmap folders for the launcher icons.
As time went on still there was not much noise out of the Android team about using launcher mipmaps, that was until Lollipop hit AOSP and the new Nexus devices hit the market. The Android Developers blog posted about preparing your apps for the new Nexus 6 and 9. This detailed a compelling reason you should use mipmap folders for your app icon and announced the shift of best practice to using mipmaps:
…Provide at least an xxxhdpi app icon because devices can display large app icons on the launcher. It’s best practice to place your app icons in mipmap- folders (not the drawable- folders) because they are used at resolutions different from the device’s current density. For example, an xxxhdpi app icon can be used on the launcher for an xxhdpi device.
Interestingly there is still no update in the Official Android documentation and it still mentions drawable folders being the place for your launcher icons. I am sure that will change in the coming months as the update to Android Studio is the next step in the progression of the change.
Update May 2015: The Android developer documentation has now been updated to document the purpose of mipmaps.
Creating a new project using launcher mipmaps
Update to Android Studio 1.1, any new project will use the new structure when it is created.
Updating an existing project to use launcher mipmaps
If you have used the excellent tool Android Asset Studio to generate your launcher icons recently you will notice the mipmap change is now reflected in the structure of assets generated. Even if you normally generate your icons through another process this is a great place to start as it shows the format and structure you should be using.
Your assets need to go into a structure much like your previous launcher drawables.
res/ mipmap-mdpi/ic_launcher.png (48x48 pixels) mipmap-hdpi/ic_launcher.png (72x72) mipmap-xhdpi/ic_launcher.png (96x96) mipmap-xxhdpi/ic_launcher.png (144x144) mipmap-xxxhdpi/ic_launcher.png (192x192)
You will also need to change your AndroidManifest.xml to use mipmaps for the launcher.
android:icon="@mipmap/ic_launcher"
'IT 통신 수학 과학 > 자바 안드로이드' 카테고리의 다른 글
| AdapterView2 (0) | 2020.11.01 |
|---|---|
| ArrayAdapter (0) | 2020.10.28 |
| Android popmenu (0) | 2020.09.08 |
| 컨텍스트 메뉴 (0) | 2020.09.06 |
| 타이머 메시지 핸들러 (0) | 2020.08.29 |
| 버튼 리스너 구현 (0) | 2020.08.23 |
| 터치 입력시험 (0) | 2020.08.19 |
| 콜백메서드 재정의 / 리스너 인터페이스 구현 (0) | 2020.08.17 |