펌 사이트 : https://gcodetutor.com/cnc-machine-training/cnc-g-codes.html
CNC G Codes
I explore a large list of CNC G Codes and look at both their function and uses on both CNC lathes and CNC milling machines
gcodetutor.com
o control CNC machines we use commands called CNC G Codes. Although Different manufactures of the machine tool may adopt their own use for certain G Codes there is a core group that is common on every machine tool. These standards are used on CNC Lathes, Milling machines, routers and more recently by 3D printers (in a very basic form). Today we are going to examine this group and how they are used to control the machines.
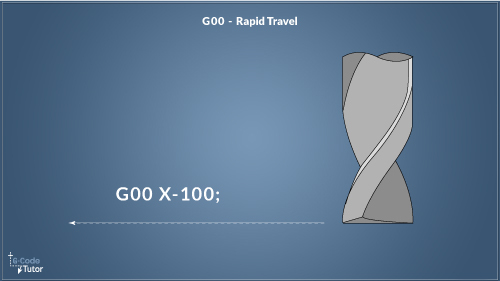
G00 - Rapid travel
It can be shortened to G0 as the older machines didn’t have much RAM and every bit counts.
This command is used when the tool is not touching the part to rapid move, normally used when going home for a tool change and returning with a new tool. Some machinists like to rapid as close to the part as possible but I advise giving yourself at least 1mm clearance. Keep your hand on the feed knob and come in slow for the first time run. It is in this mode you will do the most damage if you didn’t get your tool set up right.
G00 X-100;
In the example above I am moving the cutter 100mm to the left.
G00 is the rapid travel command in G Code. It is used when the cutter or tool is not removing material so that the time it takes to machine the part is as quick as can be. The top speed is set by the machine parameters and therefore is only controllable by the operator using a rapid override control.
When using a rapid move, be aware of any clamps, vices, and parts that may be in your path. If you are unsure it may be wise to move the X and Y axis first, then on a separate line, move down in Z. It will increase your machining time by a second or two but it will help avoid a 3 Axis crash.
The G00 command can be shortened to G0 as the older machines didn’t have much RAM and every bit counts.
- Marc
G01 - Linear Interpolation
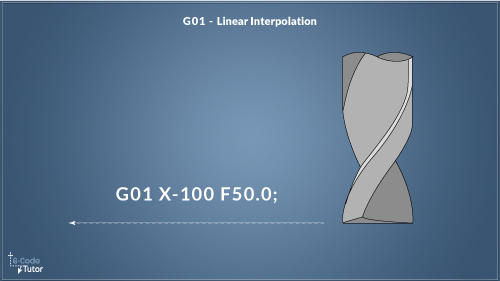
A G01 command is used when you are cutting in a straight line. This command has to have a feed rate (F) active before it will run. A typical block would look like G01 X-100 F50.0; You don’t need to add this command on every line, as long as there is no other movement G-Code active, for example, you only need to add it after a G02, G03 or a G00 command. In much the same way, a feed rate (F50) is only needed once until you want to change the speed in which you are cutting.
G00 X101 Z1.0;
G01 X100 Z-20 F100;
X110 Y-40;
G00 Z300;
This command can be used with all axis cutting at the same time, or just one. It is not common to cut with the Z axis as well as X and Y but it is possible if needed.
When programming a profile it is easier to use cutter compensation G41 and G42 then you do not need to allow for the radius of the cutter when plotting your tool paths, you can simply use the dimensions on the drawing and the machine will offset the cutter to achieve the correct dimensions.
G02 and G03 - Circular Interpolation
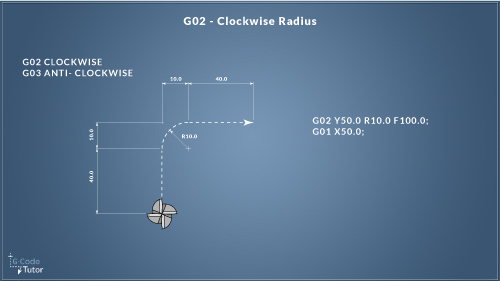
G02 is used to machine an arc or radius in a clockwise direction and G03 is for anti clockwise.
Using an ‘R’ value to define the radius, the G02/G03 command moves the cutter in a straight line with the defined radius at the end of this move.
If a feed rate is already active there is no need to add it to this line unless you wish to change the feed rate for the machining of the arc.
G03 Y50.0 R10.0 F100.0;
G01 X50.0;
The centre point of the arc can also be defined using I, J, and K values. I (X) J(Y) and K(Z) defines the auxiliary axis.
using the drawing above, programming an arc using I and J values would look like this:
G03 Y50.0 I10.0 J40.0 F100.0;
G01 X50.0;
The K is seldom used but is available if an arc using the Z axis is needed.
When using G02 with G01 and G03 (Counter clockwise arc) any shape can be machined. These three G Codes are the foundation of G Code programming and are the three you will use when cutting material.
G04 - Dwell
Sometimes we need to pause the cutter for a brief moment, for that we add a dwell to the code to stop the machine from continuing reading the program for a specified amount of time.
Uses:
While drilling with a flat bottom drill and the surface of the bore has a chattered finish, we can stop moving the drill in Z-Axis with it still rotating for half a second to clean up the surface.
G01 Z-20.0 F50; G04 X500; G01 Z5.0;
The few blocks listed above looks like the tool will move 500mm while deep in the part. It won’t. The X value in ‘G04 X500’ forces the tool to dwell for 500 milliseconds before moving onto the next block. The feed rate does not need to be specified again after a dwell command as the machine still knows that one was defined before the dwell on the G01 block.
G20 and G21 - Measurement Systems
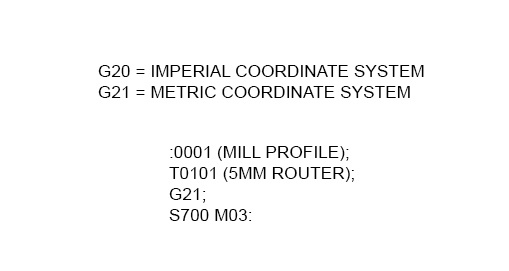
G20 and G21 Imperial and Metric systems G20 Define Inch units; G21 Define Metric units; CNC Machines can read measurements in both Imperial and Metric systems (inches and mm) this is defined by G20 and G21.
Although it is only needed once in the program it is good practice to add this information after every tool change. This makes it safer to run from any position in the program.
For example, you might want to repeat the finishing cutter pass to remove more material after measurement. To define the unit of measurement again will stop the machine from accidentally being in the wrong system and moving unexpectedly.
G90 and G91 - Absolute or Incremental
G90 = Absolute positioning
G91 = Incremental positioning
A positioning system must be defined before any movements are made, below is an explaination of both positioning systems
G90 selects the absolute positioning system. In this mode, all movements of the spindle are taken from the datum position. For example, if X100.0 is read by the control then the tool will move to 100mm in the plus direction from the datum. If X150.0 was the next positional movement it would move the tool another 50mm in that direction.
G91 selects the incremental positioning system. When G91 is active all movements of the spindle are taken from its last known position. For example, If X100.0 is read then the tool will move 100mm in the plus direction of the position that the tool is already in. If X150.0 was read after this move, The tool will move another 150mm in the plus direction.
You can read more about Absolute and Incremental positioning here
G40, G41 and G42 - Cutter Compensation
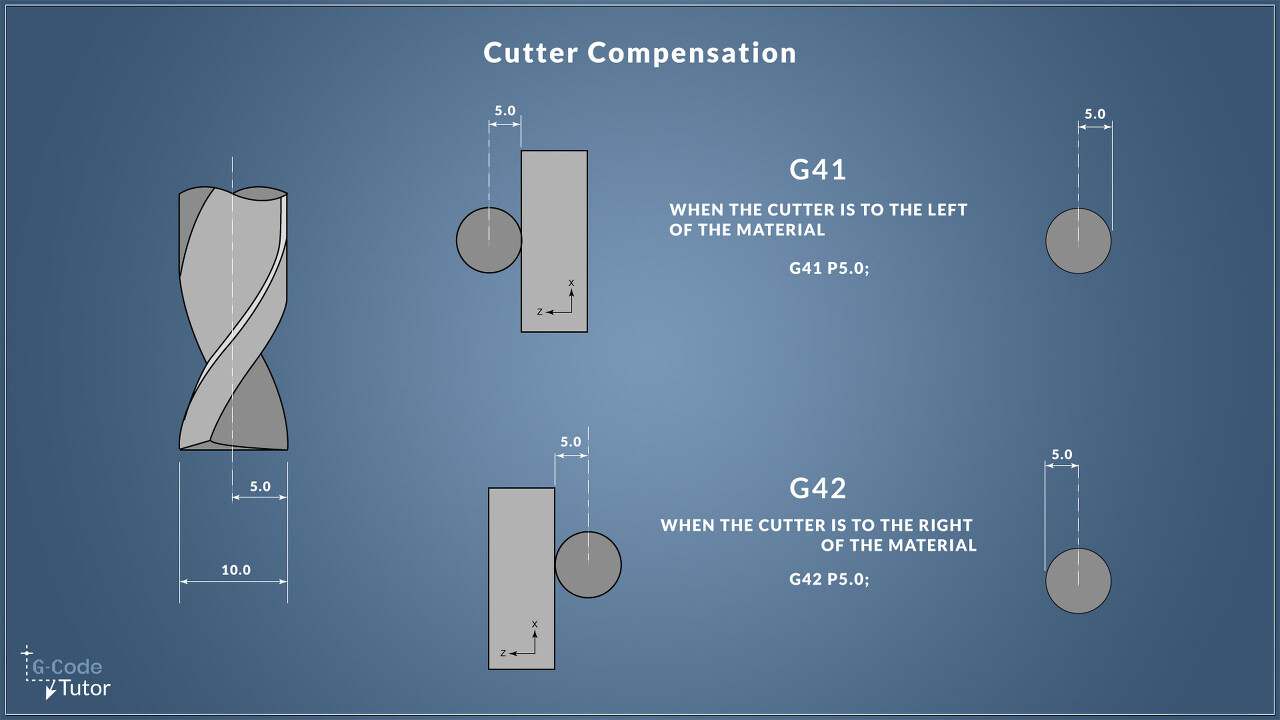
G40 = Cancels cutter compensation
G41 = Left cutter compensation
G42 = Right cutter compensation
Without using cutter compensation when programming we would have to allow for the diameter of the tool when writing the cutting paths. We can program to the dimensions of the component by using cutter compensation.
This offsets the cutter by its radius depending on the direction of cut.
For more information, check out this article on cutter compensation
Multiple Repetitive Cycles (Lathe)
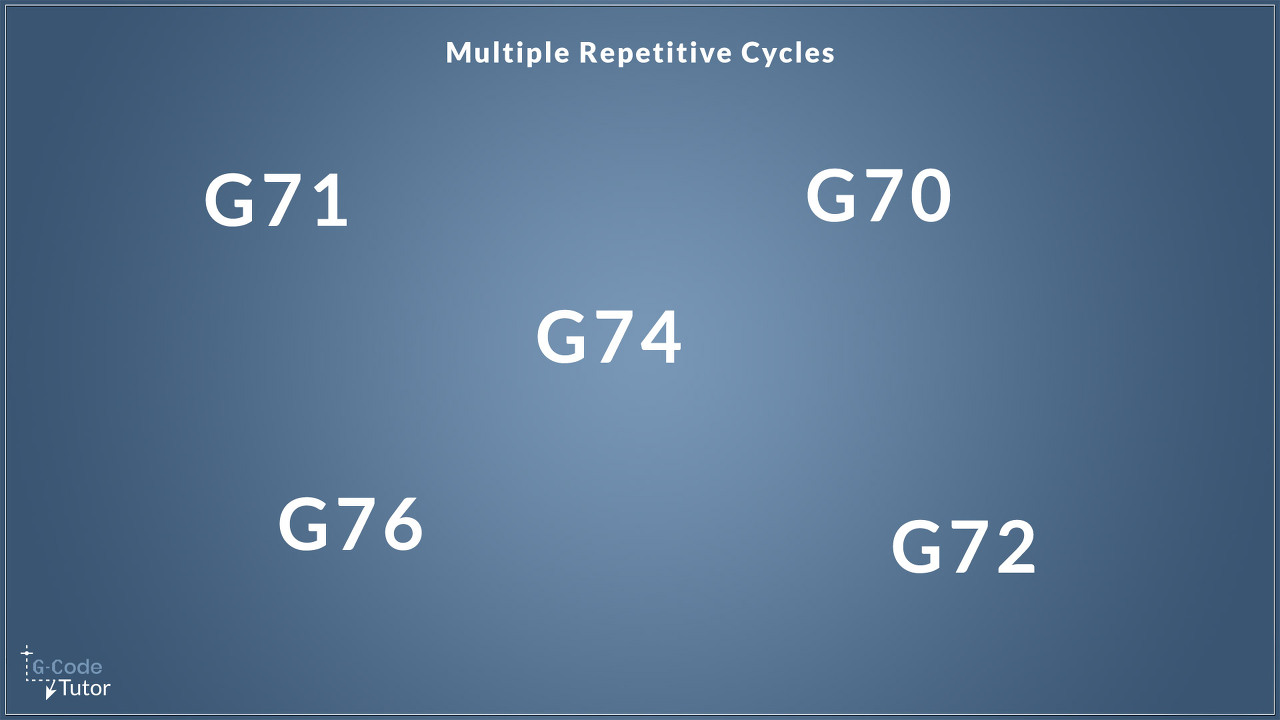
G70 = Finishing Cycle
G71 = OD/ID Roughing Cycle
G72 = Rough facing cycle
G73 = Pattern repeating cycle
G74 = Face grooving cycle
G75 = Grooving cycle
G76 = Screw thread cutting cycle
Multiple repetitive cycles enable the programmer to remove a lot of material with just a few lines of g-code, often reusing the profile as a subroutine. These repetitive cycles allow the machine to take care of the tool paths which speeds up the programming process. To learn more about each individual multiple repetitive cycle, check out this article
Canned Cycles
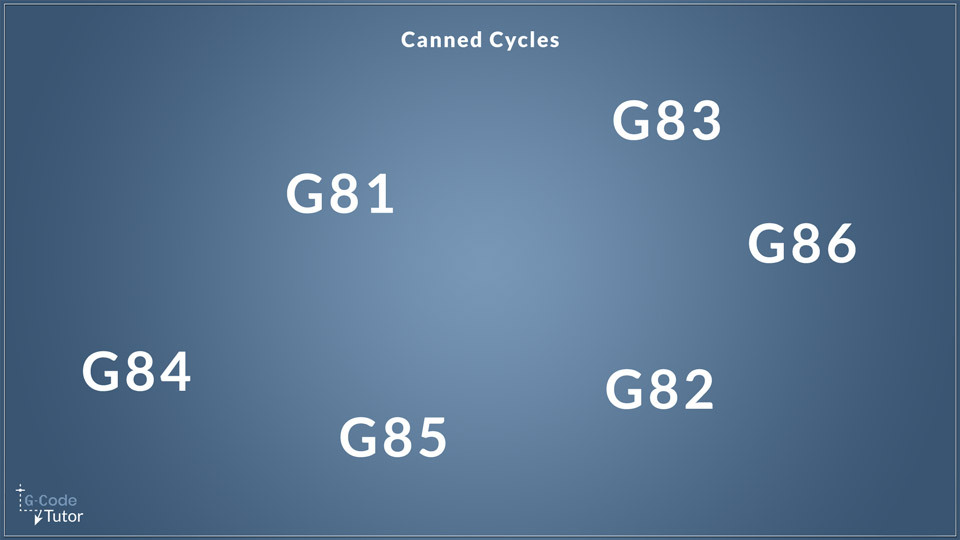
G80 = Cycle
G81 = Drilling Cycle
G82 = Counter Bore Cycle
G83 = Peck Drilling Cycle
G84 = Rigid Tapping Cycle
G85 = Boring Cycle (bore in, bore out)
G86 = Boring Cycle (bore in, rapid out)
Canned cycles enable us to write g-code to drill and bore many holes with minimum lines of g-code. They allow us to give all the information on a single line, then the following lines are positional.
Read more on what a canned cycle is here and how we program with them here
While this article covers only the most basic of G-Codes, below is a more complete list.
CNC G Codes list
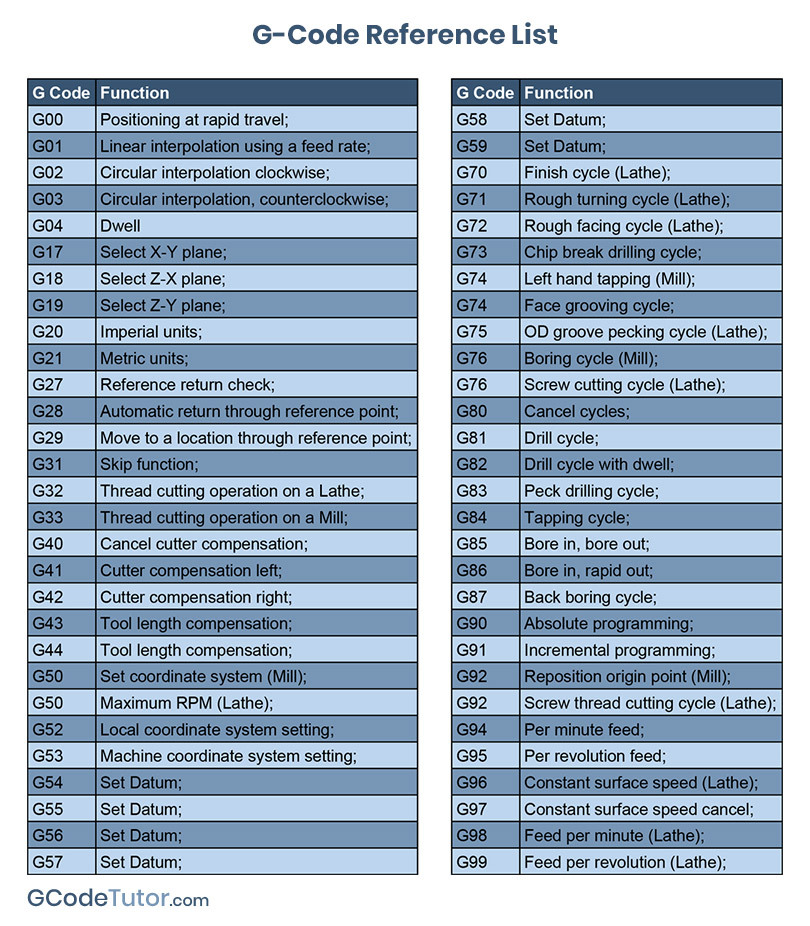
Below is a full list of common G Codes most of which we will discuss in future articles
- G00 Positioning at rapid travel;
- G01 Linear interpolation using a feed rate;
- G02 Circular interpolation clockwise;
- G03 Circular interpolation, counterclockwise;
- G04 Dwell
- G10 Set working datum postion;
- G17 Select X-Y plane;
- G18 Select Z-X plane;
- G19 Select Z-Y plane;
- G20 Imperial units;
- G21 Metric units;
- G27 Reference return check;
- G28 Automatic return through reference point;
- G29 Move to a location through reference point;
- G31 Skip function;
- G32 Thread cutting operation on a Lathe;
- G33 Thread cutting operation on a Mill;
- G40 Cancel cutter compensation;
- G41 Cutter compensation left;
- G42 Cutter compensation right;
- G43 Tool length compensation;
- G44 Tool length compensation;
- G50 Set coordinate system (Mill) and maximum RPM (Lathe);
- G52 Local coordinate system setting;
- G53 Machine coordinate system setting;
- G54~G59 Set Datum;
- G70 Finish cycle (Lathe);
- G71 Rough turning cycle (Lathe);
- G72 Rough facing cycle (Lathe);
- G73 Pattern Repeating Cycle;
- G74 Left hand tapping Mill;
- G74 Face grooving cycle;
- G75 OD groove pecking cycle (Lathe);
- G76 Boring cycle;
- G76 Screw cutting cycle (Lathe);
- G80 Cancel cycles;
- G81 Drill cycle;
- G82 Drill cycle with dwell;
- G83 Peck drilling cycle;
- G84 Tapping cycle;
- G85 Bore in, bore out;
- G86 Bore in, rapid out;
- G87 Back boring cycle;
- G90 Absolute programming;
- G91 Incremental programming;
- G92 Reposition origin point;
- G92 Screw thread cutting cycle (Lathe);
- G94 Per minute feed;
- G95 Per revolution feed;
- G96 Constant surface speed (Lathe);
- G97 Constant surface speed cancel;
- G98 Feed per minute (Lathe);
- G99 Feed per revolution (Lathe)